Tables
Tables are useful for presenting complex information, such as numerical data, comparisons or schedules in a way that is easy to read and understand.
When to use tables
Do
- Use tables to display complex information and data that is too detailed for the text.
- Use only as much text or data as you need to make sure the table is easy to understand.
Don't
- Use tables if there is a simpler and more accessible way to display content, such as a list.
- Create a table for only 1 or 2 items. Report them in the body of the text instead.
- Assume that the data or information within a table is obvious. You may need some additional body content to explain the data you are presenting.
Before you start
Consider what type of page template will suit your table. If you are creating a table with lots of content in the cells or many columns, consider using the landing page template. Only the landing page template will allow full width containers. See an example of how wide tables display in different container types.
How to create a table
Follow these instructions to create a table directly in the CMS or, alternatively, copy and paste an existing table from an Excel document.
- In your Block / WYSIWYG, click on the Table icon.

- From the Table dropdown a grid will show for you to select how many rows and columns you want your table to have. Once you select your rows and columns, your table will show in your WYSIWYG to customise.
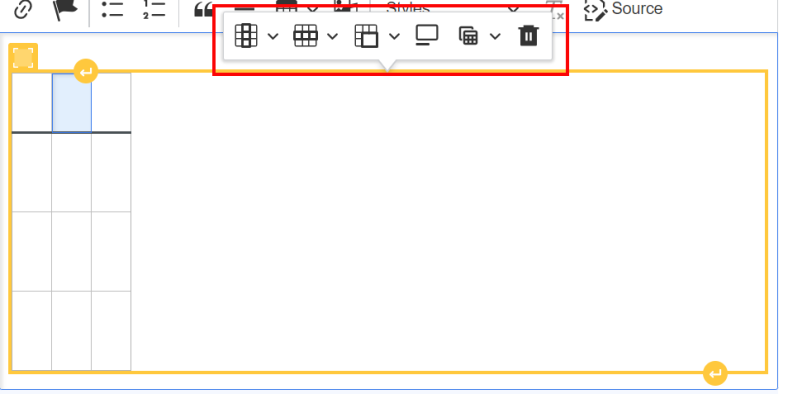
- Click on your table and the edit options will show for you to format your table.

Formatting your table
You can change how your table looks although it's not mandatory to make changes.
- If you choose to make the first row or the first column and the first row headers the content in them will appear bold.
The NSW Digital Design System style guidelines for tables specify that tables shouldn't be used without headers or with only the first column as headers. See examples of tables that shouldn't be used. - Adding a caption for your table can increase the accessibility of your table and give context to the information it contains. An example of a caption could be: This table shows the number of births and deaths between 1950 and 2020.
- Turning the striped option on will show alternating rows in white or pale grey.
- Ticking the bordered box will show a thick black line outlining your table. Borders should only be used when there's lots of complicated content in the table.
- The full width box should be ticked if you have a large data set that has many columns. This will enable users to scroll left to right to see content that has not fit within the screen view.
- The stacked box is used for mobile devices to wrap and stack the content to fit within a mobile screen – instead of the full page width that is visible on a desktop device. This option is ticked by default.
After you have made your changes, save your page.
Copy and paste a table from Excel
You can copy and paste a table into the CMS from an excel document. To copy an Excel table:
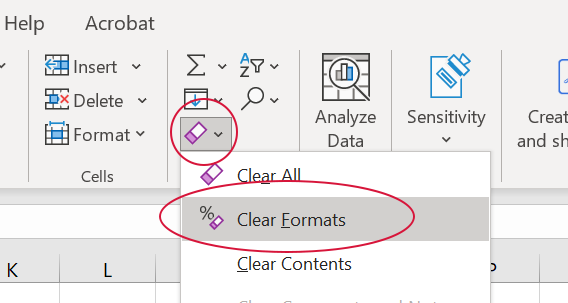
- Open your Excel document and clear the formatting by selecting all content (CTRL+A) and clicking the Clear formats button.

- Select the entire table in Excel, copy it and paste it into a block / WYSIWYG container the CMS.
- Select all the content in the WYSIWYG block and click the remove format icon.

- Click on the table and the table format options will appear.
Editing a table
You can change or delete any part of an existing table.
To change an existing table, go to the edit screen of the Block / WYSIWYG and click on the table. The edit options will open.

Continue to adding or deleting or updating the table properties.
Adding or deleting
To add or remove cells, rows or columns from your table or the entire table:
- Click on the part of the table you want to change, for example, if you want to remove a row, click within that row. The edit options will open.
- Navigate to the change you want to make, for example Delete rows.
- Click the Update button at the bottom of your WYSIWYG block container when you are finished making your changes.
How tables display
Live examples
You can see live examples of how agencies have applied the component to their content.
- Department of Customer Service – Program evaluation
- Enterprise, Investment and Trade – Resources
- Premier's Department – Natural disaster declarations from financial year 2023-24
- Youth Justice – Current projects
- Youth Justice – Young people in Custody statistics
Table with first row as header
Created with 4 rows and 3 columns, first row as headings.
| Header 1 | Header 2 | Header 3 |
|---|---|---|
| Row 1, Column 1 | Row 1, Column 2 | Row 1, Column 3 |
| Row 2, Column 1 | Row 2, Column 2 | Row 2, Column 3 |
| Row 3, Column 1 | Row 3, Column 2 | Row 3, Column 3 |
Striped table with first row as the header
Created with 6 rows and 2 columns, first row as header with striped selected.
| Header 1 | Header 2 |
|---|---|
| Row 2, Column 1 | Row 2, Column 2 |
| Row 3, Column 1 | Row 3, Column 2 |
| Row 4, Column 1 | Row 4, Column 2 |
| Row 5, Column 1 | Row 5, Column 2 |
| Row 6, Column 1 | Row 6, Column 2 |
Striped table with no header
Created with 6 rows and 2 columns, with no header with striped selected.
| Row 1, Column 1 | Row 1, Column 2 |
| Row 2, Column 1 | Row 2, Column 2 |
| Row 3, Column 1 | Row 3, Column 2 |
| Row 4, Column 1 | Row 3, Column 2 |
| Row 5, Column 1 | Row 3, Column 2 |
| Row 6, Column 1 | Row 3, Column 2 |
Table with border
Created with 4 rows, first row as headers and 2 columns, with a border. Bordered tables should only be used if there's lots of complicated information.
| Header 1 | Header 2 |
|---|---|
| Row 1, Column 2 | Row 1, Column 3 |
| Row 2, Column 2 | Row 2, Column 3 |
| Row 3, Column 2 | Row 3, Column 3 |
Table with border and striped
Created with 4 rows, first row as headers and 2 columns, with a border and striped. Bordered tables should only be used if there's lots of complicated information.
| Header 1 | Header 2 |
|---|---|
| Row 1, Column 2 | Row 1, Column 3 |
| Row 2, Column 2 | Row 2, Column 3 |
| Row 3, Column 2 | Row 3, Column 3 |
Wide tables in the three quarters / quarter - large gutter container
Wide tables display best in full width containers and don't display well in smaller containers.
The Full width box and the Stacked box have been unticked in these tables.
You need to look at the mobile view of tables to see significant differences between wide and stacked containers.
When the data entered is short words or numbers it may be able to wrap within the cells.
| Header 1 | Header 2 | Header 3 | Header 4 | Header 5 | Header 6 | Header 7 | Header 8 | Header 9 | Header 10 |
|---|---|---|---|---|---|---|---|---|---|
| Row 2, Column 1 | Row 2, Column 2 | Row 2, Column 3 | Row 2, Column 4 | Row 2, Column 5 | Row 2, Column 6 | Row 2, Column 7 | Row 2, Column 8 | Row 2, Column 9 | Row 2, Column 10 |
| Row 3, Column 1 | Row 3, Column 2 | Row 3, Column 3 | Row 3, Column 4 | Row 3, Column 5 | Row 3, Column 6 | Row 3, Column 7 | Row 3, Column 8 | Row 3, Column 9 | Row 3, Column 10 |
When the data is longer, such as column1heading, it can't wrap and will extend across the page, causing display issues.
| column1heading | column2heading | column3heading | column4heading | column5heading | column6heading | column7heading | column8heading | column9heading | column10heading |
|---|---|---|---|---|---|---|---|---|---|
| column1value | column2value | column3value | column4value | column5value | column6value | column7value | column8value | column9value | column10value |
| column1value | column2value | column3value | column4value | column5value | column6value | column7value | column8value | column9value | column10value |
Wide tables in a full width container
Full width containers are only available on landing pages – not standard pages and are recommended for wide tables.
The Full width box has been ticked and the Stacked box has been unticked in both these tables.
| Header 1 | Header 2 | Header 3 | Header 4 | Header 5 | Header 6 | Header 7 | Header 8 | Header 9 | Header 10 |
|---|---|---|---|---|---|---|---|---|---|
| Row 2, Column 1 | Row 2, Column 2 | Row 2, Column 3 | Row 2, Column 4 | Row 2, Column 5 | Row 2, Column 6 | Row 2, Column 7 | Row 2, Column 8 | Row 2, Column 9 | Row 2, Column 10 |
| Row 3, Column 1 | Row 3, Column 2 | Row 3, Column 3 | Row 3, Column 4 | Row 3, Column 5 | Row 3, Column 6 | Row 3, Column 7 | Row 3, Column 8 | Row 3, Column 9 | Row 3, Column 10 |
| column1heading | column2heading | column3heading | column4heading | column5heading | column6heading | column7heading | column8heading | column9heading | column10heading |
|---|---|---|---|---|---|---|---|---|---|
| column1value | column2value | column3value | column4value | column5value | column6value | column7value | column8value | column9value | column10value |
| column1value | column2value | column3value | column4value | column5value | column6value | column7value | column8value | column9value | column10value |
Table formats that shouldn't be used
The following variants of the table shouldn't be used as they don't comply with the NSW Digital Design System's table guidelines.
Table without a header
Created with 3 rows and 2 columns, no headings.
| Row 1, Column 1 | Row 1, Column 2 |
| Row 2, Column 1 | Row 2, Column 2 |
| Row 3, Column 1 | Row 3, Column 2 |
Striped table without a header
Created with 6 rows and 2 columns, with no header with striped selected.
| Row 1, Column 1 | Row 1, Column 2 |
| Row 2, Column 1 | Row 2, Column 2 |
| Row 3, Column 1 | Row 3, Column 2 |
| Row 4, Column 1 | Row 3, Column 2 |
| Row 5, Column 1 | Row 3, Column 2 |
| Row 6, Column 1 | Row 3, Column 2 |
Table with the first column as the header
Created with 4 rows and 3 columns, first column as headings.
| Header 1 | Row 1, Column 2 | Row 1, Column 3 |
|---|---|---|
| Header 2 | Row 2, Column 2 | Row 2, Column 3 |
| Header 3 | Row 3, Column 2 | Row 3, Column 3 |
Mobile view of tables
All editors on a desktop device can see how tables display on mobile by following the instructions for using a responsive window to see the mobile view. Alternatively, if you are using the Chrome web browser you can see how tables appear on each mobile device model.
You can only use a desktop device, with your browser window expanded, to see the desktop view of tables.
Using a responsive window to see the mobile view
You can reduce the screen size of your web browser to see how tables display when on a mobile device.
On most browsers you can reduce your screen by clicking the restore down button in the top right hand corner of your web browser:
On a Mac this button will be the green button located in the top left of your screen.
Drag the sides of your browser until you see a mobile view of the tables like this:
Using Chrome Developer tools to see the mobile view
If you are using the Chrome web browser you can use Chrome Developer tools to see the mobile view of tables. To do this:
- Right click anywhere on your webpage and choose Inspect.
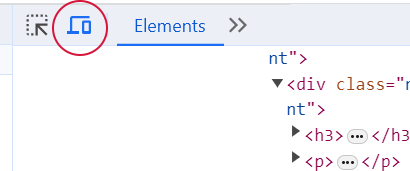
- In the top right menu, click the toggle device icon (next to the Elements button).

- In the top left, choose device type or aspect ratio from the Dimensions field.
- You can return to your normal screen view by clicking the close cross in the top right of the inspect elements window.