Uploading document files to the CMS
Guide to uploading a document file to the CMS media library.
Before you start
Consider if you can convert your file into a web page instead. By default resource web pages should be created instead of downloadable documents. Resource web pages have a print-page function and, if necessary, can also include documents as attachments. Find out how to create a single or multi-page resource. Forms can be created as webforms.
If you are uploading a document file it must comply with the document naming and governance guidelines.
How to upload a document file
To upload a new document:
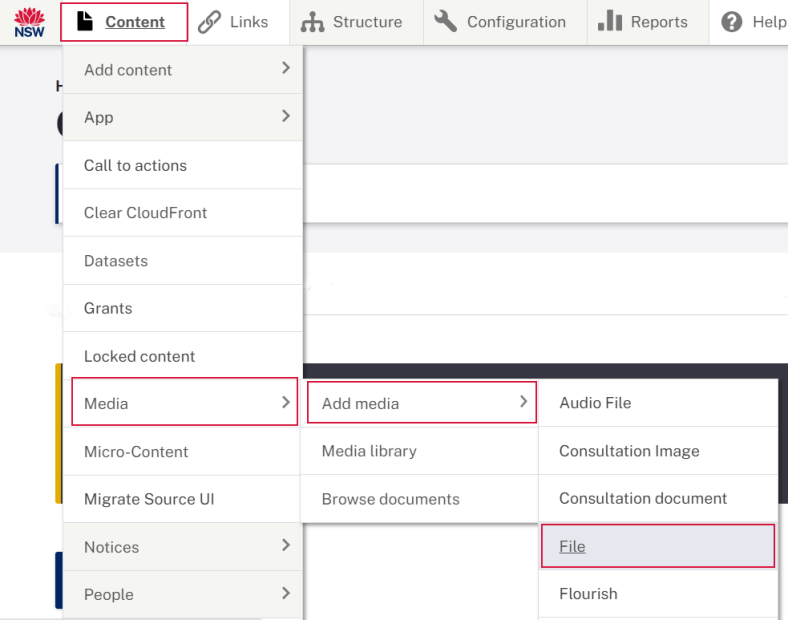
- Go to Content > Media > Add media > File. The Add File screen will open.
- Add the Title for your file. The title should be the same as the document name but without the hyphens. For example, if your file is ‘nsw-statutory-declaration-form.pdf’ then your title would be ‘NSW statutory declaration form’. Capital letters can be used in the title. The title will be shown when a user hovers over the link text.
- In the Preview section you can add an image for your file by clicking the Add media button.This field isn’t mandatory and most files won’t need to use this field. Only if your file will appear in a component or page that shows images should you add an image to your file.
- In the File sectionclick Choose file to upload your document file. Make sure your document has a descriptive file name with hyphens between words, for example 'nsw-statutory-declaration.pdf'. Find out more about document naming and governance guidelines.
The Licence field can stay at the default option of None or you can select another licence option.
In the Agency and Editorial group fields start typing and select from the dropdown list.
In the Subject matter experts field you can only select a person that has a user profile created in this CMS. This field is optional.
The Published box is ticked by default. A document will need to be published before it is linked to a web page. A published document is live and can be found by search engines, like Google or from the file's URL.
Ticking the No index checkbox prevents search engines from indexing this file, even if it is published. Although users with a direct link will still be able to find and see the file. This box can only be ticked when a file is being created. After you click the Save button you can’t tick this box later.
The Revision information field is optional if you want to add editor’s notes to your file about the changes you have made.
The URL alias field is optional if you want to create a shorter URL. However, it is recommended that you link customers to the web page that your document is on, rather than directly linking to the file URL.
Authoring information should be left unchanged.
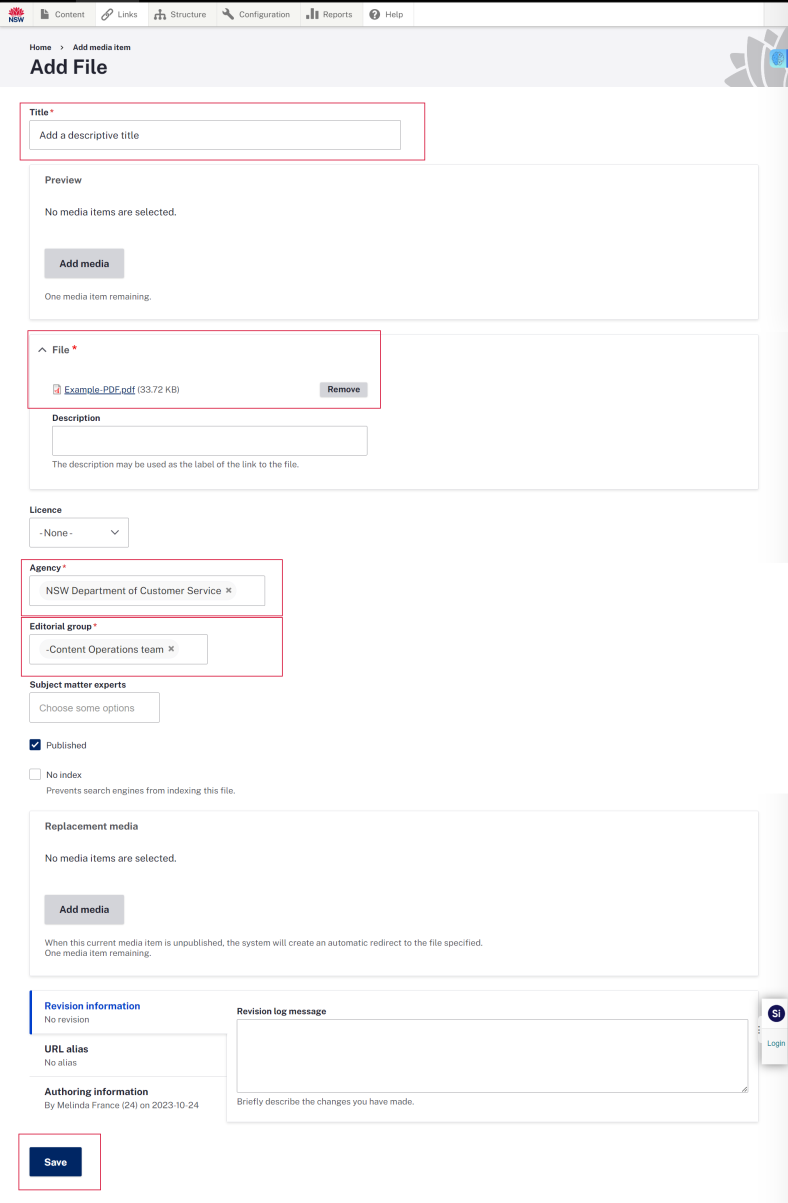
Click the Save button.


Find an existing file
To find an existing file, you’ll need to:
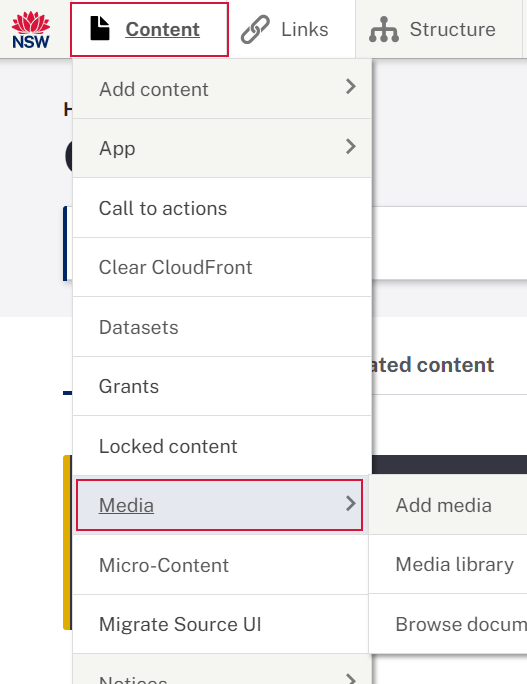
- Find your article by going to the megamenu and selecting Content > Media.
- Use the search fields to find your document and click the Filter button.
- To edit the file either:
- click the hyperlinked file name, or
- click the Edit button in the far right column. This will take you to the Edit file screen.

Replace an existing file
From the Edit file screen you can replace the file with a new version by:
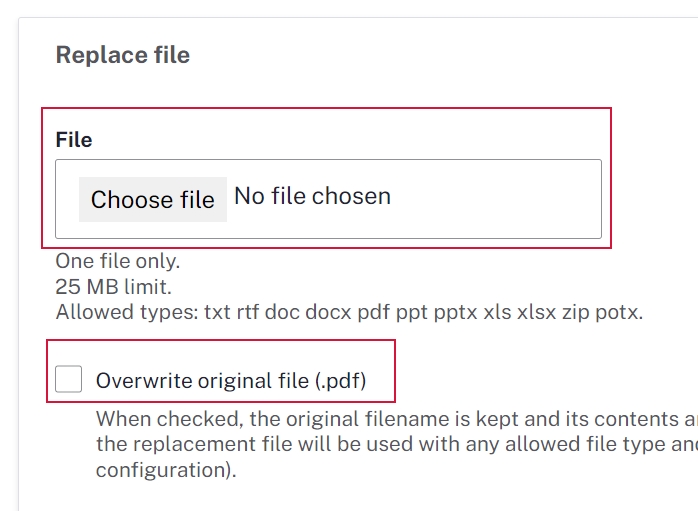
- Scrolling to the heading Replace file and clicking the Choose file button. You can only replace the file with the same type of file. For example a PDF tcan be replaced with another PDF, not a Word file.
Untick the Overwrite original file checkbox.
- Scroll to the bottom of the page and click Save.

Unpublish a file
From the Edit file screen:
- Scroll down to the Published checkbox and untick it.
- Scroll down and click Save. Your document will still exist in the CMS but only editors can see it.
Add a file to a page
There are 3 ways you can link a file to a web page. You can:
- Create a Resource page and add the file.
- Hyperlink text in a Block / WYSIWYG from a standard page, landing page or news article. To hyperlink text, follow the instructions to add links to your content – for media files. You can choose to style your hyperlink as a button.
- Create a component that can link to media files such as the links list or cards.
Examples of files on a page
File as linked text in a Block / WYSIWYG
You can add a file into the body copy of a Block / WYSIWYG with a lead in sentence then hyperlinking the text, examples include:
- Read the 2023 report (PDF 34.36KB).
- Download and complete your application form (PDF 34.36KB).
The file type and file size, such as (PDF 1MB), will be automatically generated and added to the linked text.
Bullet point list of files in a Block / WYSIWYG
If you have multiple files you could consider using a heading above a bullet point list, then linking the text, for example:
Department reports
You can download the latest reports:
- Report 2023 (PDF 34.36KB)
- Report 2022 (PDF 34.36KB)
- Report 2021 (PDF 34.36KB)
- Report 2020 (PDF 34.36KB)
File as a linked button within a Block / WYSIWYG
Links can be styled as buttons and linked to media files, for example:
Files in a Link list component
Links list example with Vertical variant applied. Find out how to create links lists for media files. Files in a links list will display the file title.
Files in a Cards component
Cards example with Two per row variant applied. Find out how to create cards linked to media files.